Automatically send WhatsApp Messages for new rows in a Google Sheet
Learn how to automatically send a WhatsApp message for every new row added, using 2Chat and webhooks.

Google Sheets is a versatile tool and can be effectively utilized as a simple contact manager. Here are the benefits of using Google Sheets for this purpose:
- Collaboration: Multiple team members can view and edit the contact sheet in real-time. This collaborative feature ensures that everyone has the most updated contact information.
- Customization: Unlike fixed-format contact management software, Google Sheets lets you design your columns, rows, and layout according to your specific needs.
- Easy Sorting and Filtering: With built-in functionalities, you can quickly sort contacts alphabetically, by date added, or by any other criteria. Filters can help you view specific groups or categories.
- Cost-Effective: For small businesses or personal use, Google Sheets is a free tool. Even for advanced features in the business tier, Google Workspace remains cost-effective compared to dedicated CRM solutions.
- Data Import/Export: Google Sheets supports various formats, making it easy to import contact lists from other platforms or export your contact list for use in another application.
- Data Validation: You can set up data validation rules to ensure that the data entered (like phone numbers or email formats) meets specific criteria, ensuring consistency.
- Conditional Formatting: With this feature, you can, for instance, highlight contacts that haven't been contacted in a while, or color-code contacts based on importance or category.
- Automation and Scripting: Using Google Apps Script, you can automate certain tasks, such as sending reminder emails or updating contacts based on specific triggers.
While Google Sheets can serve well as a simple contact manager, it's worth noting that as your needs grow and become more complex, a dedicated CRM or contact management system might offer more specialized functionalities. But for straightforward requirements, Google Sheets is an excellent starting point.
Using Google Apps Script and 2Chat you can easily create a routine that automatically sends a WhatsApp message to the contacts created. We will use the trigger feature in Google Sheets to periodically check for new rows and send a customized message using a 2Cha flow with a webhook. You can learn how to create this type of flows in this link.
Creating the Contacts Google Sheet
Create a new Google Sheet and in a new worksheet add the columns that you require, in this case we created the sheet "Contacts" with the following columns.
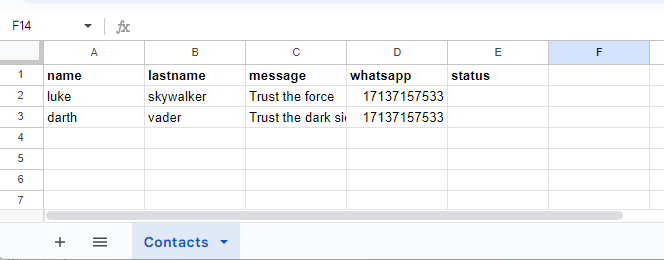
You must have a column where you will insert the destination phone number, "whatsapp" and a column for ""status" that the code will use to mark contacts processed.
Creating the 2Chat flow
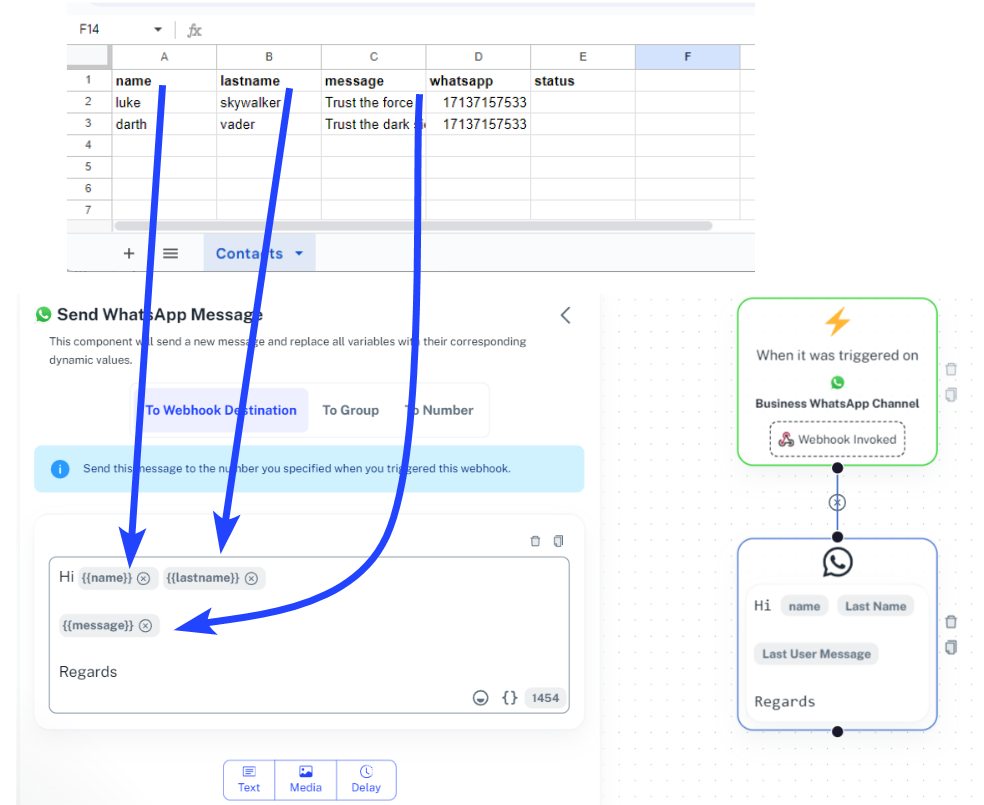
We will need now a 2Chat flow triggered with a webhook to send the customized message from Google Sheets. Create the flow following the steps detailed in this tutorial, and you must make sure you have a ""message" component using the sheet columns as variables.
Adding the Google Apps Script to send WhatsApp Message
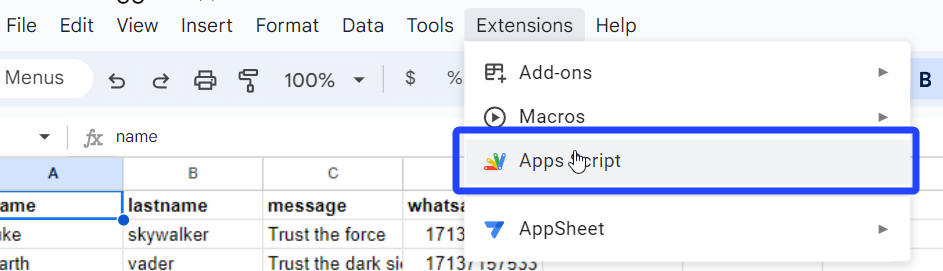
Now return to your Google Sheet and open a Google Apps Script
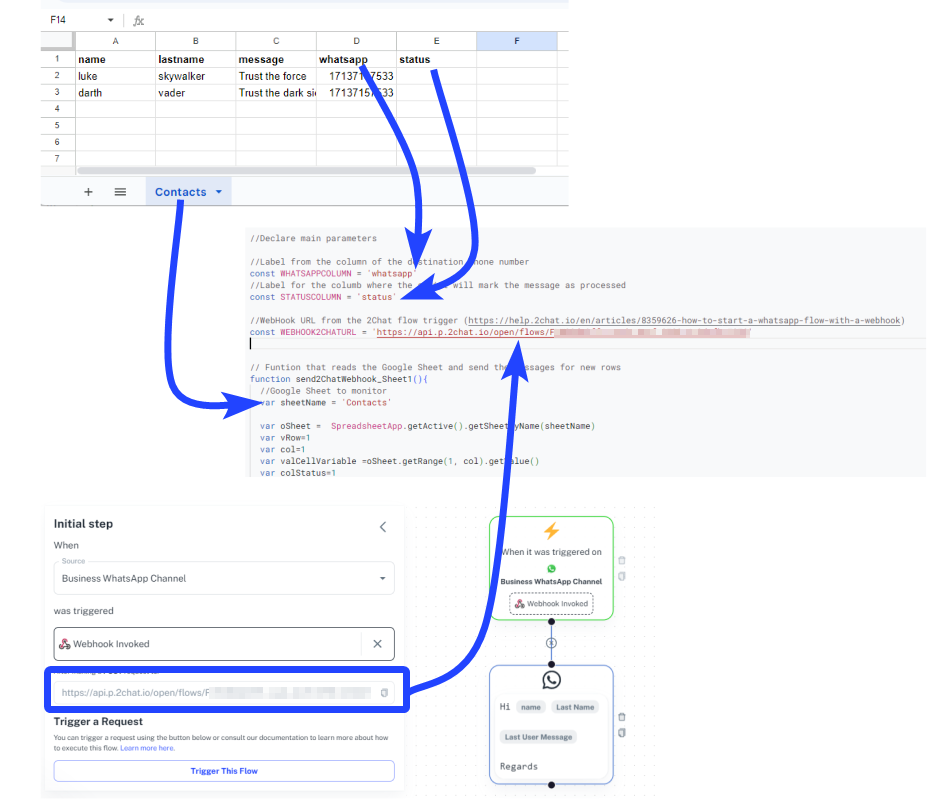
Copy the following code and paste it in the code window
//Declare main parameters

//Label from the column of the destination phone number
const WHATSAPPCOLUMN = 'whatsapp'
//Label for the columb where the script will mark the message as processed
const STATUSCOLUMN = 'status'

//WebHook URL from the 2Chat flow trigger (https://help.2chat.io/en/articles/8359626-how-to-start-a-whatsapp-flow-with-a-webhook)
const WEBHOOK2CHATURL = '[REPLACE YOUR 2CHAT FLOW WEBHOOK]'


// Funtion that reads the Google Sheet and send the messages for new rows
function send2ChatWebhook_Sheet(){
  //Google Sheet to monitor
  var sheetName = '[REPLACE WITH YOUR CONTACTS WORKSHEET NAME]'

  var oSheet =  SpreadsheetApp.getActive().getSheetByName(sheetName)
  var vRow=1
  var col=1
  var valCellVariable =oSheet.getRange(1, col).getValue()
  var colStatus=1
  var blnStatus=false
  var blnWhatsApp=false
  // Read column names
  while (valCellVariable!=''){
    if (valCellVariable==STATUSCOLUMN){
      colStatus=col
      blnStatus=true
    }else if(valCellVariable==WHATSAPPCOLUMN){
      blnWhatsApp=true
    }
    col++
    valCellVariable =oSheet.getRange(1, col).getValue()

  }

  // The sheet must have a status and WhatsApp phone number columns
  if (blnStatus && blnWhatsApp) {
    var vRow=2
    var valCellValue =oSheet.getRange(vRow, 1).getValue()
    var valCellStatus =oSheet.getRange(vRow, colStatus).getValue()
    // Read all the Sheets' rows ignoring the "Processed"
    while (valCellValue!=''){
      if (valCellStatus!="Processed"){
        //When is not processed send the message
        send2ChatWebhookRequest(sheetName,vRow,WHATSAPPCOLUMN,STATUSCOLUMN)
      }
      vRow++
      valCellValue =oSheet.getRange(vRow, 1).getValue()
      valCellStatus =oSheet.getRange(vRow, colStatus).getValue()
    }
  }
}


// Function to send WhatsApp Message using 2Chat flows trigger
function send2ChatWebhookRequest(vSheet,vRow,vWhatsAppColumn,vStatusColumn){
  var vWhatsAppLabel = vWhatsAppColumn
  var JSONrequest = {"to_number": "",
                        "variables": {}
                    }
  var variables=[]
  var oSheet =  SpreadsheetApp.getActive().getSheetByName(vSheet)
  var col=1
  var colStatus = 0
  var valCellVariable =oSheet.getRange(1, col).getValue()
  var valCellValue =oSheet.getRange(vRow, col).getValue()

  //Read columns and create JSON request
  while (valCellVariable!=''){
    if (valCellVariable==vWhatsAppLabel){
      JSONrequest.to_number='+' + valCellValue.toString().replace('+','')
    }else if(valCellVariable==vStatusColumn) {
      colStatus=col
    }else{
      JSONrequest.variables[valCellVariable]=valCellValue
    }
    col++
    valCellVariable =oSheet.getRange(1, col).getValue()
    valCellValue =oSheet.getRange(vRow, col).getValue()
  }

  //Create request
  var data = JSON.stringify(JSONrequest)
  var options = {
    'method' : 'post',
    'headers':{
      'Content-Type': 'application/json'
    },
    'payload' : data
  };


  var Webhook2ChatURL=WEBHOOK2CHATURL
  try{
    //Invoke 2Chat Webhook
    var response =UrlFetchApp.fetch(Webhook2ChatURL, options);
    oSheet.getRange(vRow, colStatus).setValue('Processed')
  }catch(e){
    //Error handling, you could use e.message for full technical information about the error
    oSheet.getRange(vRow, colStatus).setValue(e)
  }

}
Replace the missing parts in the code with your own parameters
Add test values to Google Sheets to validathe if the code works and besides provide code authorizations. Remember that the 2Chat flow must be published

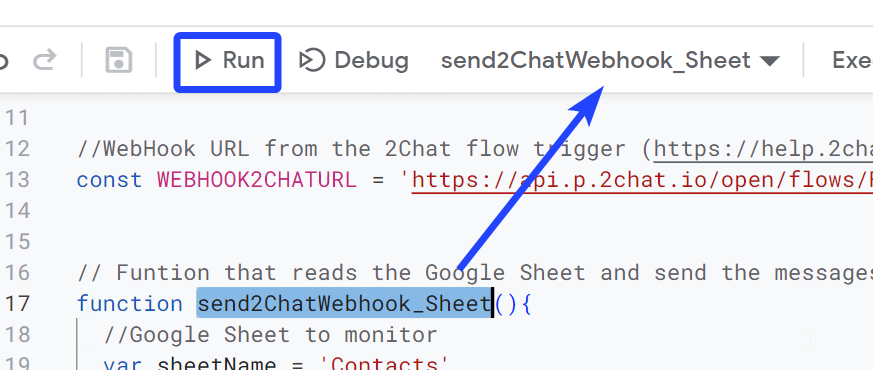
Now select in the code select send2ChatWebhook_Sheet and click on Run
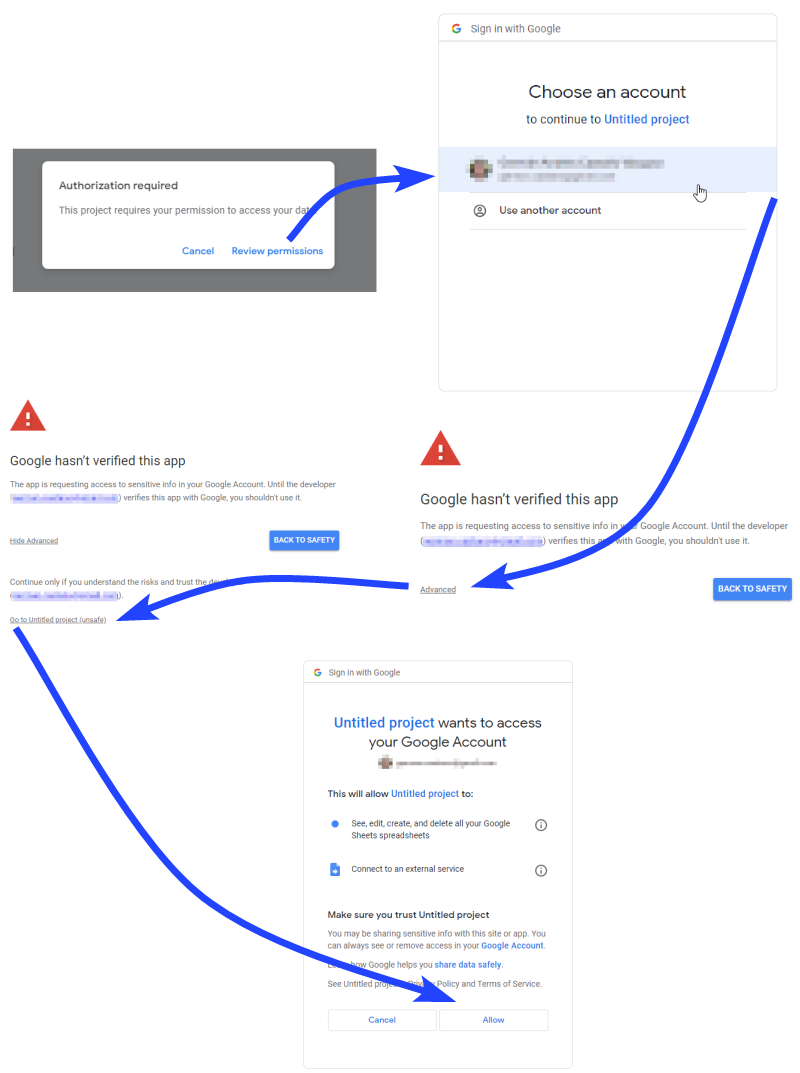
After the first execution you must accept the authorization, you can follow this workflow as a guide.
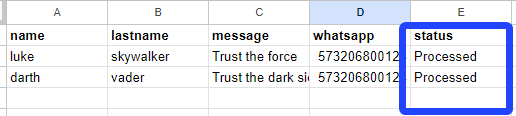
If everything works fine you will see a ""Processed" text in the ""Status" column
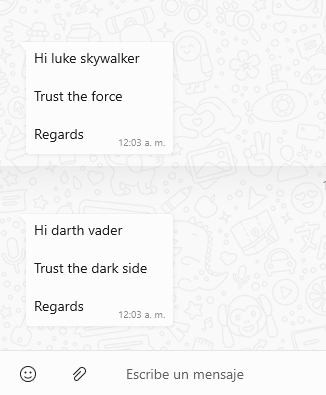
And you will receive the customized message in the destination phone number:
Programming the time driven trigger in Google Sheets
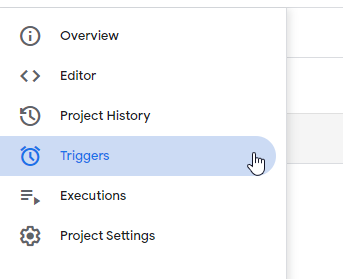
Now that we can send WhatsApp messages from Google Sheets, we will use a time driven trigger to automatically send messages for every new row. For this you must first enter the Triggers section
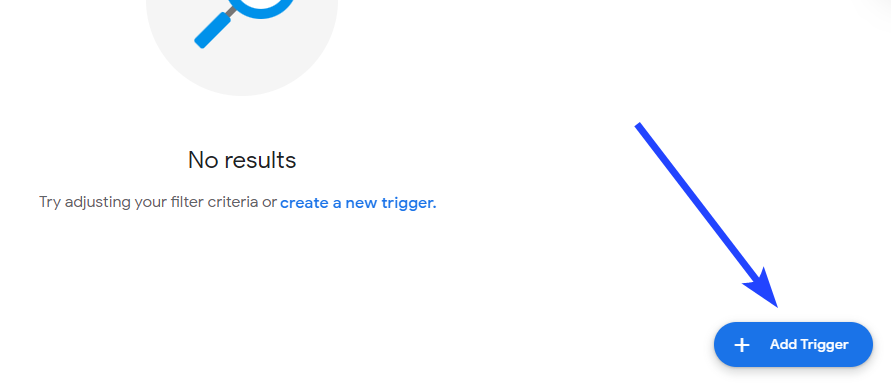
Click on Add Trigger
First select the function send2ChatWebhook_Sheet or the function you want to run periodically; select Time-driven as event source and select the type of trigger and the interval.
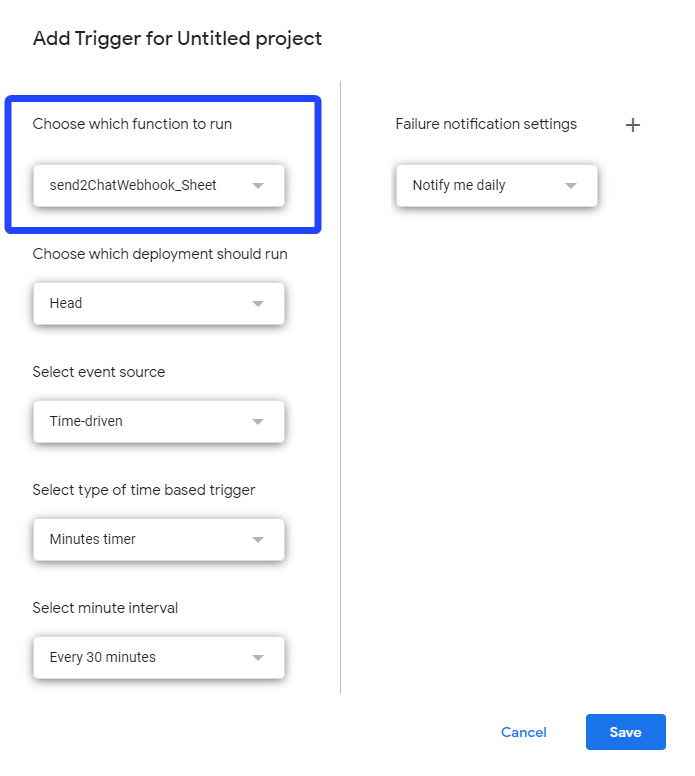
Click on Save and with this now every new contact will receive the WhatsApp message even when you have closed the sheet.
Create a new trial account in 2Chat, activate your WhatsApp phone number in minutes to boost your sales and customer service processes.