Never Lose a WhatsApp File Again: Automated Google Drive Backup for Your Business
Learn to automate WhatsApp file backups to Google Drive using 2Chat. This tutorial shows digital marketing pros and entrepreneurs how to easily organize client documents and boost efficiency.

From customer inquiries and project updates to sharing essential documents, files are constantly flowing through your chats. However, let's be honest, manually sifting through conversations to find and save important media can be a significant time drain and a major headache. What if you could automatically save every file your clients send you directly into an organized Google Drive folder? Imagine the time saved, the improved organization, and the peace of mind that comes with knowing all your critical client data is securely backed up and easily accessible.
With a powerful platform like 2Chat and a little help from Google Apps Script, you can set up a seamless automation that keeps your WhatsApp files perfectly organized in Google Drive. This isn't just a technical trick; it's a strategic move to boost your business efficiency, enhance client management, and ensure no important document ever gets lost in the shuffle.
Ready to transform your WhatsApp workflow? Let's dive in!
Step 1: Setting Up Your 2Chat Conversation Flow
Your journey to automated file backup begins in 2Chat, where we’ll configure a "Conversation Flow" to detect and process incoming files.
Initiate the Flow:
- Go to Flows in your 2Chat dashboard.
- Create a new flow (or modify an existing one).
- Set the trigger: When a message is received on your Business WhatsApp Channel.
- Set Flow Memory to "At least once at any time" with a short interval (e.g., 1 second) to ensure all messages are processed.
- Add a Conditional Flow block.
- Configure it to check if the "Last Received Message" Has media and if it Equals True. This ensures only messages containing files (images, documents, videos) proceed to the next step.
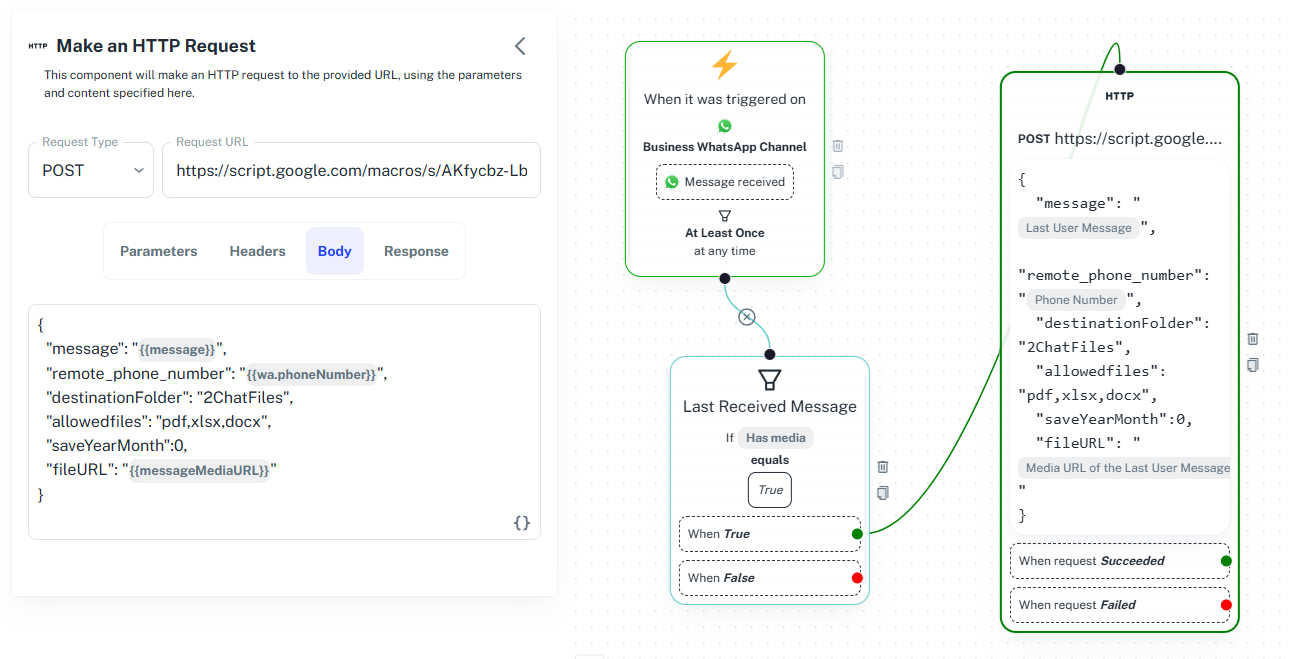
- On the "When True" branch of your conditional flow, add an HTTP Request component. This is where 2Chat will send the file's information to our Google Apps Script.
- Request Type: Select POST.
- Request URL: For now, leave this blank. We'll fill it in later once we deploy our Google Script.
- Body (JSON format): This is crucial. You'll send specific data that your Google Script will use to save the file. Here’s an example structure:codeJSON
{
    "message": "{{message}}",
    "remote_phone_number": "{{wa.phoneNumber}}",
    "destinationFolder": "2ChatFiles",
    "allowedFiles": "pdf,xlsx,docx",
    "saveYearMonth": "1",
    "fileURL": "{{messageMediaURL}}"
}
Let's break down these parameters:
- "message": The content of the last received message.
- "remote_phone_number": The WhatsApp number of the client who sent the file. This is fantastic for organizing files by client!
- "destinationFolder": The name of the main folder in your Google Drive where all 2Chat files will be stored. You'll need to create this manually (we'll cover that next).
- "allowedFiles": A comma-separated list of file extensions you want to allow (e.g., pdf,xlsx,docx). This helps filter out unwanted file types.
- "saveYearMonth": This controls your folder structure. Set to "1" to save files in subfolders organized by year and month (e.g., /2ChatFiles/CLIENT_PHONE_NUMBER/2023/08/file.pdf). Set to "0" to save directly within the client's phone number folder.
- "fileURL": The direct URL to the media file received via WhatsApp. This is what the Google Script will use to download the file.
Step 2: Creating Your Google Apps Script
Now, let's create the Google Apps Script that will actually receive the information from 2Chat and save the files to your Google Drive.
Access Google Apps Script:
- Go to your Google Drive (make sure it's the account where you want to store your business files!).
- Click on + New > More > Google Apps Script. This will open a new, untitled Apps Script project.
- Click on "Untitled project" at the top and rename it something descriptive, like "2Chat WhatsApp Files" or "WhatsApp Drive Backup." This helps keep your projects organized.
- Delete any default code in the Code.gs file.
- You'll find the necessary script code on the 2Chat GitHub repository. Navigate to the Tutorials repository, then into GoogleAppScript, and open the 2ChatWhatsAppDrive.gs file.
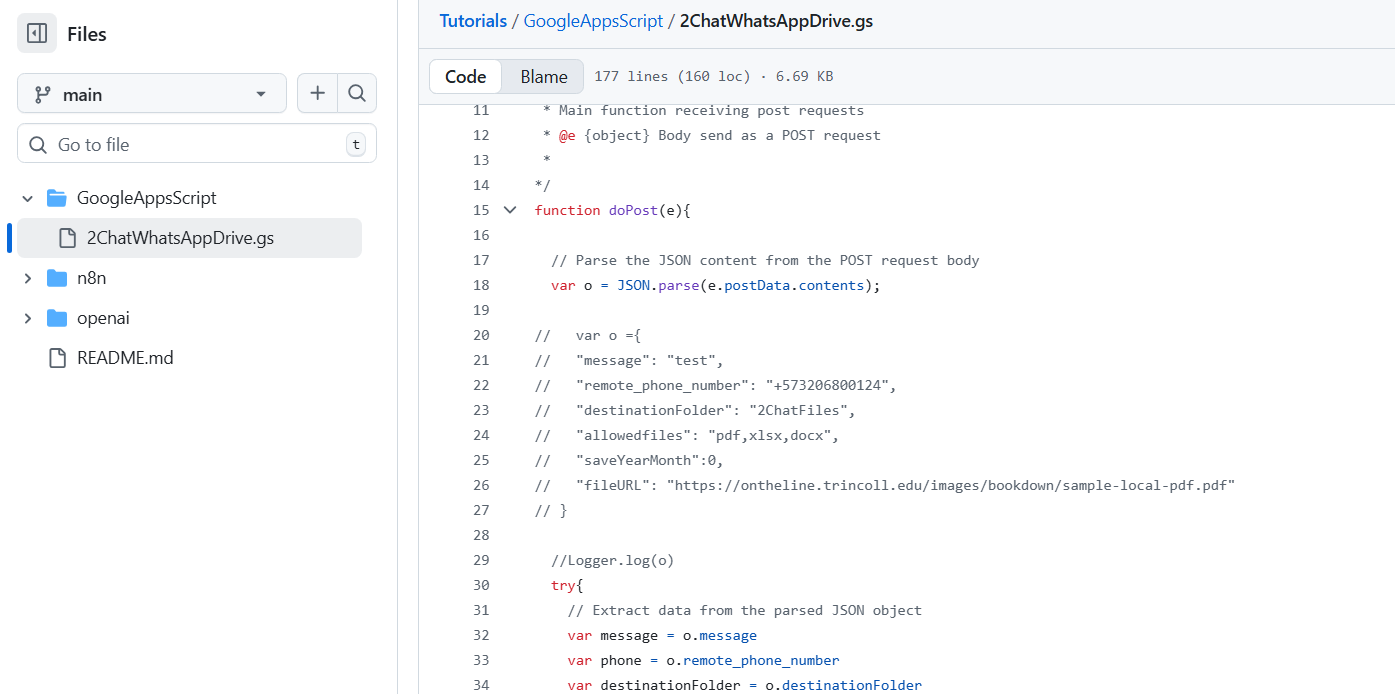
- Copy the entire code from this file.
- Paste it into your Code.gs file in the Google Apps Script editor.
- Click the Save to save your project.
Step 3: Configuring and Deploying Your Script
Once the code is in place, you need to deploy it as a web application so 2Chat can communicate with it.
Deploy as Web App:
- Click the "Deploy" button in the top right corner.
- Select "New deployment."
- In the "Select type" dropdown, choose "Web app."
- Description: Add a brief description, e.g., "v1" for version 1.
- Execute as: Crucially, ensure this is set to "Me (your-email@yourdomain.com)". This grants the script permission to access your Google Drive account to save the files.
- Who has access: Select "Anyone." This allows 2Chat (an external service) to send requests to your script. Don't worry, the script only saves files, it doesn't expose your entire Drive.
- Click "Deploy."
Authorize Access:
- A prompt will appear asking for authorization. Click "Authorize access."
- Select your Google account.
- Review the permissions (it will ask to see, edit, create, and delete Google Drive files, and connect to an external service). Click "Allow." This gives your script the necessary permissions to function.
Copy the Web App URL:
- Once authorized, the deployment will complete, and you'll see a "Deployment succeeded" message.
- Copy the Web app URL provided. This is the link 2Chat will use to send file data to your script.
- Click "Done."
Step 4: Connecting 2Chat to Your Google Script
Now, let's link your 2Chat flow to your newly deployed Google Apps Script.
Paste the URL:
- Go back to your 2Chat conversation flow (the browser tab you left open from Step 1).
- In your HTTP Request component, paste the copied Web app URL into the "Request URL" field.
- Click "Save Changes" in the top right corner of 2Chat.
Step 5: Preparing Your Google Drive
Before testing, make sure your designated destination folder exists in Google Drive.
Create "2ChatFiles" Folder:
- Go to your Google Drive.
- Click + New > New folder.
- Name this folder exactly what you specified in the destinationFolder parameter in your 2Chat HTTP Request body (e.g., 2ChatFiles).
Key Takeaways for Your Business:
- Effortless Organization: No more searching for lost files! All client documents are neatly categorized by client, year, and month (or directly by client).
- Time-Saving Automation: Free up valuable hours previously spent on manual file handling. Focus on growing your business, not on administrative tasks.
- Centralized Record-Keeping: Keep all important client media in a single, accessible, and secure cloud storage location. Perfect for team collaboration and audit trails.
- Enhanced Client Management: Quickly retrieve client-specific documents, improving your response time and service quality.
- Scalability: This setup grows with your business. As more clients send files, your system automatically handles the backup.
Streamline your WhatsApp Business with ease! Automate file backups and more. Start your free 2Chat trial today!
Sign Up for 2Chat Now!