Monitoring WhatsApp Group Joins and Leaves - A Step-by-Step Guide
Learn how to automatically track WhatsApp group member joins and leaves directly in Google Sheets. This step-by-step guide helps you automate community management, save time, and gain valuable data-driven insights for your business.
If you're using WhatsApp groups to build a community, run a course, or manage customer support, you know how powerful they can be. But you also know the headache of trying to keep track of who’s coming and going. Manually checking member lists is time-consuming and, let's be honest, a bit of a drag.
What if you could automatically log every single time someone joins or leaves your group directly into a Google Sheet? Imagine having a real-time dashboard of your community's growth and churn. This data is gold! It helps you understand what’s working, when people are most engaged, and when they might be losing interest.
In this tutorial, we’re going to show you exactly how to set up this powerful automation using 2Chat and a workflow tool called n8n. No complex coding required—just a simple, step-by-step process to put your community management on autopilot.
Here’s What You'll Achieve
Once you're done, your system will work like this:
- Someone joins your group? A new row appears in your Google Sheet with their phone number, the date, and the group they joined.
- Someone leaves your group? Another row appears, logging that they left.
This creates an effortless, permanent record of all member activity, giving you invaluable insights at a glance.
What You’ll Need Before We Start
- A 2Chat Account: This is the tool that connects your WhatsApp to the automation.
- An n8n Account: This is the automation platform where we'll build our workflow.
- A Google Account: For the Google Sheet where all the magic will be stored.
- Admin Privileges: This is crucial! The WhatsApp number connected to your 2Chat account must be an administrator of the group(s) you want to monitor.
Your Step-by-Step Guide to Automated Tracking
We've created a ready-to-use template for this workflow, so you don't have to build it from scratch.
Step 1: Import the Workflow into n8n
First, we need to get the workflow into your n8n canvas.
- Download our pre-built workflow template file
- In your n8n dashboard, click the options menu and select "Import from File."
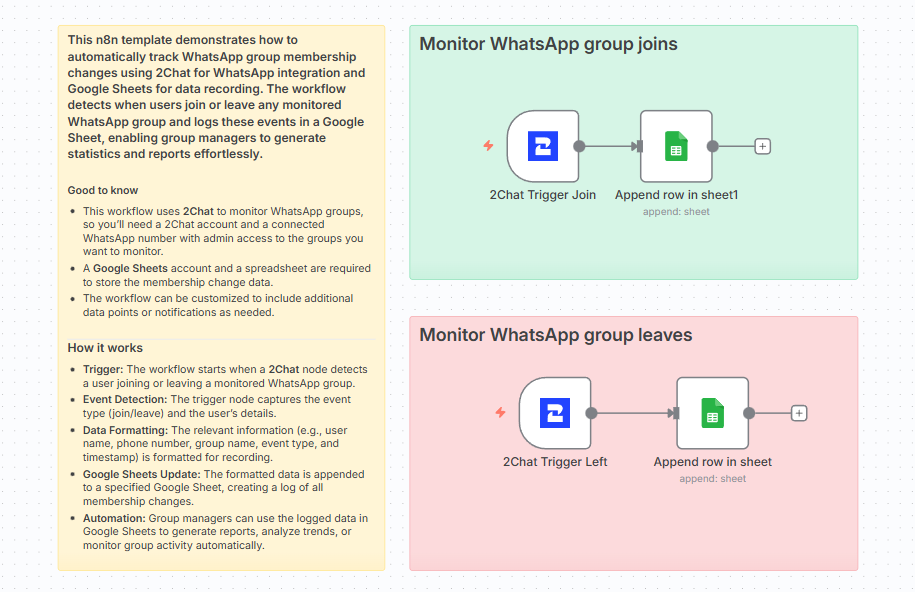
- Select the .json file you just downloaded and import it. You'll see two workflows appear on your screen: one for monitoring joins and one for monitoring leaves.
Step 2: Connect Your 2Chat Account
Now, let's connect n8n to 2Chat so they can talk to each other. We’ll do this for both the "Joins" and "Leaves" workflows.

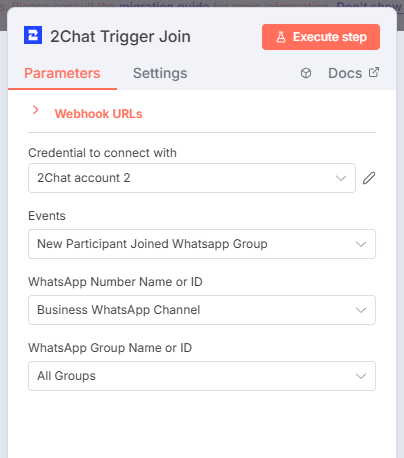
- Click on the first node, the "2Chat Trigger" (the one with the WhatsApp icon).
- Under "Credential to connect with," click "Create new credential."
- You'll need an API Key. Think of this as a secure password that lets n8n access your 2Chat data.
- To find it, go to your 2Chat dashboard, navigate to the "Developers" section on the left menu, and click on "API Keys."
- Click "New API Key," give it a friendly name (like "n8n Monitor"), and save it.
- Click the copy icon next to your new key.
- Paste this key back into the credential window in n8n and click Save.
Step 3: Configure Your Triggers
With your account connected, you need to tell the workflow what to watch for.
For the "Monitor WhatsApp group joins" workflow:
- Events: Ensure "New Participant Joined WhatsApp Group" is selected.
- Business WhatsApp Channel: Select the phone number you want to use.
- All Groups: You can choose to monitor all groups; this number is an admin in, or you can select specific groups from the list.
For the "Monitor WhatsApp group leaves" workflow:
- Do the same, but make sure the Event is set to "Participant Left WhatsApp Group."
Step 4: Connect Your Google Sheets
Next, let's tell the workflow where to put the data.
- Click on the second node, "Append row in Sheet."
- Connect your Google Sheets account by following the prompts.
- In the Document field, select the Google Sheet you created for this purpose.
- In the Sheet field, select the specific tab within that spreadsheet.
- The Google Sheets template already maps the data for you (phone number, name, date, etc.), so you don't need to change anything else here!
Repeat this process for the Google Sheets node in the "leaves" workflow.
Step 5: Activate Your Workflow!
You're at the finish line!
- Click the "Save" button at the top right.
- Toggle the switch from "Inactive" to "Active."
That’s it! Your automated WhatsApp group monitor is now live. Sit back, relax, and watch the data roll in.
Key Takeaways for Your Business
So, what can you actually do with this new superpower?
- Measure Community Growth: Track your sign-ups and see how your marketing efforts translate into new members.
- Understand Churn: Identify patterns in when people leave. Was it after a promotional message? Or during a quiet period? This is vital feedback to improve your community strategy.
- Build Your Contact List: You're automatically capturing the phone numbers of interested people who join your group, creating a valuable list for future engagement (just be sure to respect privacy and consent!).
- Implement Retention Strategies: When someone leaves, this automation can be expanded to trigger another action, such as sending a follow-up message to request feedback.
You’ve just saved yourself hours of manual work and unlocked a new layer of insight into your business's community.
Ready to put your WhatsApp marketing on autopilot and get data-driven insights? Sign up for your 2Chat account today and transform how you manage your business communities!